Friday, February 19, 2010
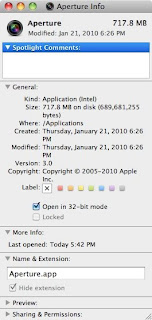
My time with Aperture thus far has been less than stable. I've turned off the Faces feature because it was causing my machine to hang as it tries to identify people. It's mostly wrong anyways (no, we don't all look the same) so no real loss there. But a quick search into some of my woes today I discovered that a lot of other people are also having problems. Apparently the frequency of crashes drop dramatically when you switch to 32-bit mode. Seriously? Back to 32? You really know how to make it hurt, Apple.
To make Aperture open in 32-bit mode, select the application in Finder. Select File > Get Info (or just ⌘I). You should see a checkbox for "Open in 32-bit mode." Close the window and then restart Aperture.
Read more...
Thursday, February 18, 2010
It's been 4 days since I've installed Aperture 3. I'm still reprocessing and identifying faces. Granted, this is my primary machine so I've had to pause the processing during the day but seriously? I've basically been locked out of using my machine since the processing takes so much memory. I have about 35k photos in my library. I really don't think it's that large, but I guess Aperture 3 is having an issue with that.
On another note, Faces is terrible. When it works, it's like magic. But when it doesn't, it sure makes Apple like dumb. Some of the mistakes that it makes are best described as comical. I normally would post a screenshot, but to protect the identities of the people who have been gracious enough to allow me to photograph, I'm skipping it this time. Somebody should make Aperture take the "All look same" test. Cuz I'm pretty sure it'll fail. Badly.
Read more...
Wednesday, December 9, 2009
 Ok, so I've been bad. I haven't posted an update in over a month. The silly thing is that I had already processed this image weeks ago. Regardless, here are the steps for this one:
- Select the Red Channel
- Apply these values:
- B: 0.00
- 1/4: 0.19
- G: 0.28
- 3/4: 0.47
- W: 0.92
- Select the Green Channel
- Apply these values:
- B: 0.00
- 1/4: 0.16
- G: 0.31
- 3/4: 0.66
- W: 1.00
- Select the Blue Channel
- Apply these values:
- B: 0.00
- 1/4: 0.30
- G: 0.59
- 3/4: 0.80
- W: 1.00
- Exposure: -0.54
- Highlights: 42.5
 Read more...
Friday, October 30, 2009
 I'm a big fan of Aperture's plug-in architecture. The one I use most often is probably Color Efex Pro 3.0 by Nik Software. But the downside of using plug-ins, is that once the image goes through the plug-in, you lose the non-destructive nature of editing photos in Aperture. So over the next few weeks, I'm going to attempt to recreate as many of the cross processing methods in Color Efex by just using the Levels palette within Aperture. I'm going to just go down the list starting with B01.
The adjustments that have to be applied aren't terribly complicated, but there are a lot. So once the settings are approximately what you desired, it's probably a good idea to save the levels adjustment as a preset. Here's the picture that I'll be attempting to recreate:

First thing to do is to enable quarter-tone controls in the Levels palette. It's the icon right below the gears. It looks like a rectangle with two lines down it. Once it's on, you don't have to turn it on again.
- Select the Red Channel
- Apply these values:
- B: 0.21
- 1/4: 0.42
- G: 0.61
- 3/4: 0.71
- W: 0.92
- Select the Green Channel
- Apply these values:
- B: 0.00
- 1/4: 0.25
- G: 0.42
- 3/4: 0.63
- W: 1.00
- Select the Blue Channel
- Apply these values:
- B: 0.00
- 1/4: 0.15
- G: 0.33
- 3/4: 0.77
- W: 0.94
With those settings, I get the picture below.
 Read more...
Thursday, September 17, 2009

I don't know what's worse: the fact that I actually know the majority of keyboard shortcuts in Aperture or the fact that I'm excited that somebody actually made a
keyboard shortcut cheat sheet. The post is almost 2 years old -- that's how long it's been since Aperture 2's had a major update, I guess. But the content is still all correct from my cursory glance at the two sheets. Included in the ZIP is a printable version and a pretty version.
Read more...
Wednesday, August 5, 2009

This particular effect is sometimes over done, but I'll still pull it out at least once per event. It's a good way to bring your viewers attention to some particular color or object. In my example, I took a picture of a bride and groom kissing while holding out their bouquet. The scene is already not very rich in color beside the flowers so this was a good sample to demonstrate the Dodge & Burn tool in Aperture.
Dodge & Burn is a plug-in that shipped with Aperture 2.1. When Aperture 2.1 launched, the big new feature was support for plug-ins. It's an incredibly useful plug-in (especially for those without Photoshop) since it includes a whole collection of tools for editing your photos. The Dodge & Burn plug-in includes:
- Dodge (Lighten)
- Burn (Darken)
- Saturate
- Desaturate
- Sharpen
- Blur
- Contrast
- Fade
To begin, right click on the photo and select "Edit with" > "Dodge & Burn." Aperture will make a copy of the file (sorry, no more non-destructive changes!) and load that in the window. In the upper left drop down you'll see all the tools. There's only three settings with each tool.
- Size is the size of the brush. You can also change the size by using the scroll wheel or dragging two fingers on the track pad.
- Softness refers to the edge of the brush. The lower the number the harder the edge. I generally go for something pretty close to 1.00. If I want a harder edge, I just go back through the area with a smaller brush.
- Strength is how much of the effect you want. For my picture I knew I wanted a completely desaturated look, so I pushed strength all the way up.
For my picture, I chose to desaturate. Then I simply brush where I want my picture to be desaturated. It really helps to have a tablet when doing a complicated photo like this. The plug-in supports pressure sensitive controls which makes getting this done a lot faster. Once the painting of desaturation is done, simply hit Save in the lower right hand corner. DONE! (Ok, not really done. Once I finished painting, then I upped the contrast, saturation, vibrance, and sharpening; then I added a heavy dose of vignette.)
A big caveat about using plug-ins -- this one or any other one. Using plug-ins is DESTRUCTIVE! Aperture makes a copy of the image as a TIFF or PDF (check your settings) and that's what's used to edit. When you are in a plug-in or export, you're manipulating that file. Once you hit Save, that's it. There's no going back to some middle state like you can when you are just playing with your adjustments palette. Once you've got that TIFF/PDF duplicate, that's it. If you put that file into another plug-in, the "Master" or "Original" state of that image is whatever you last saved. So for my picture, it would be the post-processed version, not the true full color master image as you'd expect. One other thing. Once you have the TIFF/PDF duplicate, whenever you send that file to edit in an external editor or another plug-in, it no longer creates another duplicate. So if you want to create multiple states, then you have to manually duplicate the duplicate before you drop it into an external editor or plug-in.
Click through the thumbnail above to see a larger version of the
final image. Congrats M&R on your wedding!
Tuesday, July 21, 2009
One of my favorite features in Aperture is the ability to tether (via USB) a camera to the Mac and get instant results from my shots. Start by going to the menu (there's no default keyboard shortcut): File > Tether > Start Session. The dialog that shows up should be pretty familiar to you by this point. It looks pretty similar to the Import dialog. Click the Start Session button, and you're ready to roll.
Click the shutter or hit the Capture button in the tether HUD. Bam! It's in Aperture. Take another shot. Bam! It's in the project. The immediate feedback is extremely gratifying. Set Aperture to full screen mode (
F) and you'll see a full screen render of the image as it's shot. This can be useful and more accurate for dialing in settings on the camera (better than looking at the LCD screen on the back of the camera) or giving a model some immediate feedback. Just be sure to use a LONG (15' or more) USB cable or you might yank your Mac to the ground.
The biggest problem with tethered mode lies somewhere between Canon and Apple. Starting with the 30D and all their DSLRs since then, Canon changed how they support PTP. None of the new models can be tethered to Aperture. I'm currently shooting with a 40D -- I am a sad panda. (You Nikon people don't have anything to worry about for now.)
 My time with Aperture thus far has been less than stable. I've turned off the Faces feature because it was causing my machine to hang as it tries to identify people. It's mostly wrong anyways (no, we don't all look the same) so no real loss there. But a quick search into some of my woes today I discovered that a lot of other people are also having problems. Apparently the frequency of crashes drop dramatically when you switch to 32-bit mode. Seriously? Back to 32? You really know how to make it hurt, Apple.