Saturday, January 22, 2011
I've been thinking about switching this blog to be more about photography and post-processing in general. Now that I'm trying to get my name and a brand out there, I've decided to do just that. Yes, I could very easily switch this in blogspot, but I wanted to migrate to something new. I've exported and imported all the posts on here to the new blog. Nothing will be lost. Just a minor switch in venue that hopefully few people will notice.
From here on out, please visit
woodsonphotography.blogspot.com.
Read more...
Tuesday, January 11, 2011
The whole point of Aperture is to reduce the dependency on larger, more complicated applications like Photoshop. I find working in Aperture to be far faster when working with a large number of photos. But ultimately, there are still more than a few tweaks that I can only do in Photoshop that I can't achieve in Aperture. A lot of my issues stem around the performance of the brushes (see my previous
posts). Nonetheless, for certain effects it's totally possible to achieve basically the same results as in Photoshop. I used to do my cross processing in Photoshop, but now I've saved it as a preset in Aperture. A similar preset is also preinstalled with Aperture 3. Over at
ChaseJarvis.com, he's posted up an article comparing what can be achieved in a black and white photo between Aperture and Photoshop.
Read more...
Friday, December 31, 2010
Aperture places a small badge overlay in the lower right hand corner whenever an image has adjustments, keywords, or other changes applied. I really only remember what a couple of them are. I'll convert this into pdf, but for now here's the link to all of their meanings in the
manual.
Read more...
Tuesday, June 1, 2010
Over at
PhotoFocus Scott Bourne answers some
questions about Aperture 3.0. All the questions are pretty basic. The people asking the questions seem like either beginners or have never used Aperture 3.0 before. Either way, it's worth a quick skim.
On an unrelated topic, I'm currently working on exporting old or delivered projects out into Libraries and then burning them to disc. I'll write up my experiences about that later once I've gotten it to the point where I want it to be.
Read more...
Monday, May 24, 2010
Guess I should have mentioned this earlier...
CreativeLive started a FREE 3 week online course on Aperture 3. There are three sessions:
- What's New with Aperture 3
- Working with Aperture 3
- Scott Bourne's Aperture Work Flow
Unfortunately these classes are only free if you watch them live -- which is on Mondays at 3PM Pacific time. It's not exactly convenient for me to spend two hours during my work day so I haven't been able to give a review of the class. But hey, free education is free education. So I figured I should spread the word.
If watching live isn't your thing, you can buy the full six hours of videos for $39 until next Monday. After that, the price goes up to $79.
Sunday, April 18, 2010

Step 1 right after I import in my images after a shoot is I rate my photos. I try and keep a consistent rating scale when I go through my photos (see below). I'll go into Full Screen Mode (
F) and keep my fingers on the number keys. They correspond to the ratings (1-5).
★★★★★ : This photo is perfect out of the camera. It absolutely needs to be delivered.
★★★★ : This photo is pretty good. It might need some post-processing, but it most likely will be delivered.
★★★ : This photo is ok. It's on the line. I'll need to look at it a few times before I decide whether or not to deliver it. It will most likely need some post-processing before being delivered.
★★ : This photo is not that good, but it might be good to somebody else. I'm keeping it in the library in case I need filler.
★ : This photo is not good. I will most likely delete this photo after I've delivered the shoot.
As I go through the pictures, I'm also not shy about hitting the 9 key to reject a photo. These are the blurry, out of focus, random photos that I wouldn't show anybody. I'll use reject instead of delete at this point because delete takes longer. It's faster to just reject and then batch delete all the files at a later date.
I wouldn't recommend only selectively rating your photos. When you do that, you are basically saying that all the photos that you are NOT rating are not worthy to be rated. In that case, you might as well reject them since you don't plan on using them. By rating all of your photos, you are also making sure that you've gone through and at least looked at all of your photos.
Sunday, March 28, 2010
I didn't want to make my blog just full of complaints about Aperture 3, but lately it's just so cumbersome that I can't help but complain about it. I had tried to stay away from this particular topic thinking that maybe it's was just because I was running a large library, but no. I've come to the conclusion that Aperture 3 is a big fat bloated pig. (Extra points if you know where the "big fat bloated pig" comment comes from, btw.)
I am running a MacBook Pro with 2.4 GHz Intel Core 2 Duo and 4 GB 1057 MHz DDR3. For some reason, it really doesn't seem like that's enough for Aperture 3. Granted my machine isn't the latest and greatest, but it's no slouch either. I spend the majority of my time in Aperture 3 waiting for it to process or generate thumbnails. The skin smoothing brush is near useless if I can't see what it's doing. I am literally writing this blog post in between brush strokes. Do you remember Doogie Howser? At the end of every episode, Doogie types a journal entry? But he types pretty darn slow. Well, it's basically like that for me when I use Aperture and blog at the same time. I'll make a brush adjustment. Flip back to Safari and start typing in the text box. Aperture 3 so totally consumes my CPU that it's even causing a text box to be slow in rendering. Seriously big fat bloated pig time.
There is some hope in the land of Aperture 3 with its promises of advanced editing tools. I have it on good knowledge that one of the engineers that I absolutely respect is now joining the iPhoto/Aperture team to focus on performance improvements. The team really needs help because right now it's near impossible to use. There are many days when I wish I can just go back to Aperture 2. (This cycle feels similar to Adobe Illustrator. They used to release a version with a bunch of new features. The subsequent version would be an incremental improvement but drastic speed improvements. Next version: features. Version after: speed.)
Here's a slight update to my workflow. I've separated all of my stuff out into two Libraries. One is my archive; the other is my working library. I import into my working library under a new project. Once I've delivered the photos, I'll export the project and then import it into my archive. My archive gets backed up to multiple hard drives and locations. Now when I'm working on files, I'm working on a pretty lean library.
Read more...
Sunday, March 21, 2010
Aperture 3 inherited the ability to synchronize with Flickr from iPhoto 09. I was pretty excited to use this feature but after dealing Aperture's native synchronization, I think I'm going back to the Flickr Export Tool for Aperture. Creating a Flickr album is as simple as creating any other album so I won't go into the how. I'd rather get into what's wrong with this feature.
- It deletes then uploads. Flickr allows its Pro users to replace a photo so it retains its comments and view count. With Aperture sync, the photo is deleted then uploaded AND it's tagged that it's been replaced. So now I fear tweaking any of my photos after I've uploaded because I don't want to lose my count and comments if I accidentally hit the sync button. This is my #1 peeve and my deal breaker.
- No individual picture permission controls. While 99% of the pictures I upload are available to anyone, I like to upload the occasional pre-processed image. Then I link to it within the comments so people can compare without having the picture show up in my stream. Example.
- It's slow. Aperture and Flickr initially syncs a bunch of metadata before the actual picture uploading. As the album grows, that sync gets longer and longer. I would edit photos, add to album, upload, and repeat. Now I'm adding a bunch of sync time every time I add some photos to upload. I would have been better off creating a local photo album, process all the photos, then create the Flickr album. It really doesn't save me any time. If anything it's just extra processing.
- There's no synching of existing albums. It would have been nice to be able to pull all or some of my old photos in from Flickr, but there's no ability to do that. Aperture only has access to the albums that were created within Aperture. I deleted my Flickr login from Aperture, entered it back in, then lost the connection for that album between Aperture and Flickr.
It's not all bad. There are some nice features. It has two-way sync similar to MobileMe albums. If you add photos to a sync'd album, then Aperture can pull that picture in. GPS coordinates are also shared between Flickr and Aperture.
The tool can be useful as long as you are aware of its limitations and are willing to work within its confines. For me, it's just too restrictive.
Monday, March 8, 2010

One of the most exciting features in Aperture 3 is the ability to apply a mask on any of your adjustments by "brushing" them in/out. Having multiple adjustments and brushes feels very similar to layers with masking. In any adjustment panel, click on the gear and select "brush adjustment in/out." In the picture to the left, I made an enhancement adjustment, dropped the saturation and ran the contrast up. Then I used the brushed the adjustment off of the hydrant. The process was further expedited through the use of the "detect edges" feature. This first came out in Aperture 2's repair tool. I'm glad that this technology made it over to the brushes because on something like this photo with all hard edges I was able to do this in about 2 minutes.
Not quite content with the color, I then added another Enhancement adjustment panel by clicking on the gear and selecting "Add New Enhancement adjustment." On that adjustment, I bumped up my saturation and vibrance. This made the hydrant pop even further. Neat. So remember that
localize color post I had a while back? Yeah, this makes it way easier and all native and non-destructive.
One of the side effects of having multiple adjustment panels is that you no longer have any limits to the max value of an adjustment. For example, the max value for saturation is 4.0. Well, if you want to go beyond that, then add another Enhancement adjustment. Now run that saturation up to 4.0. Wash. Rinse. Repeat.
There's some really exciting effects you can create natively within Aperture now. For example, you can touch up the sky without affecting the rest of the image. I'm pretty excited about this and hopefully I'll do something cool enough to share on here.
On a completely unrelated note, explored some interesting spots to shoot in Seattle. Only problem is that they are best with morning light. Any volunteers feel like being my model at the crack of dawn?
Read more...
Wednesday, March 3, 2010
I'm now back to running Aperture 3 at 64-bit after the last update. I also recommend running the ProKit update as well. It seems to have fixed some issues around crashing when using the new brush feature. So far so good.
Aperture 3 seems a little more adept at switching between libraries. So I might take some time and retire/archive some of my old projects and just keep a library offline. It'll reduce the weight of the library that I carry around with me on my laptop and hopefully it'll also improve performance.
Read more...
Friday, February 19, 2010
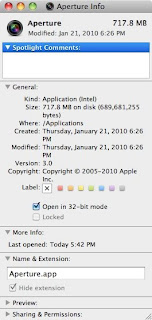
My time with Aperture thus far has been less than stable. I've turned off the Faces feature because it was causing my machine to hang as it tries to identify people. It's mostly wrong anyways (no, we don't all look the same) so no real loss there. But a quick search into some of my woes today I discovered that a lot of other people are also having problems. Apparently the frequency of crashes drop dramatically when you switch to 32-bit mode. Seriously? Back to 32? You really know how to make it hurt, Apple.
To make Aperture open in 32-bit mode, select the application in Finder. Select File > Get Info (or just ⌘I). You should see a checkbox for "Open in 32-bit mode." Close the window and then restart Aperture.
Read more...
Thursday, February 18, 2010
It's been 4 days since I've installed Aperture 3. I'm still reprocessing and identifying faces. Granted, this is my primary machine so I've had to pause the processing during the day but seriously? I've basically been locked out of using my machine since the processing takes so much memory. I have about 35k photos in my library. I really don't think it's that large, but I guess Aperture 3 is having an issue with that.
On another note, Faces is terrible. When it works, it's like magic. But when it doesn't, it sure makes Apple like dumb. Some of the mistakes that it makes are best described as comical. I normally would post a screenshot, but to protect the identities of the people who have been gracious enough to allow me to photograph, I'm skipping it this time. Somebody should make Aperture take the "All look same" test. Cuz I'm pretty sure it'll fail. Badly.
Read more...
Wednesday, December 9, 2009
 Ok, so I've been bad. I haven't posted an update in over a month. The silly thing is that I had already processed this image weeks ago. Regardless, here are the steps for this one:
- Select the Red Channel
- Apply these values:
- B: 0.00
- 1/4: 0.19
- G: 0.28
- 3/4: 0.47
- W: 0.92
- Select the Green Channel
- Apply these values:
- B: 0.00
- 1/4: 0.16
- G: 0.31
- 3/4: 0.66
- W: 1.00
- Select the Blue Channel
- Apply these values:
- B: 0.00
- 1/4: 0.30
- G: 0.59
- 3/4: 0.80
- W: 1.00
- Exposure: -0.54
- Highlights: 42.5
 Read more...
Friday, October 30, 2009
 I'm a big fan of Aperture's plug-in architecture. The one I use most often is probably Color Efex Pro 3.0 by Nik Software. But the downside of using plug-ins, is that once the image goes through the plug-in, you lose the non-destructive nature of editing photos in Aperture. So over the next few weeks, I'm going to attempt to recreate as many of the cross processing methods in Color Efex by just using the Levels palette within Aperture. I'm going to just go down the list starting with B01.
The adjustments that have to be applied aren't terribly complicated, but there are a lot. So once the settings are approximately what you desired, it's probably a good idea to save the levels adjustment as a preset. Here's the picture that I'll be attempting to recreate:

First thing to do is to enable quarter-tone controls in the Levels palette. It's the icon right below the gears. It looks like a rectangle with two lines down it. Once it's on, you don't have to turn it on again.
- Select the Red Channel
- Apply these values:
- B: 0.21
- 1/4: 0.42
- G: 0.61
- 3/4: 0.71
- W: 0.92
- Select the Green Channel
- Apply these values:
- B: 0.00
- 1/4: 0.25
- G: 0.42
- 3/4: 0.63
- W: 1.00
- Select the Blue Channel
- Apply these values:
- B: 0.00
- 1/4: 0.15
- G: 0.33
- 3/4: 0.77
- W: 0.94
With those settings, I get the picture below.
 Read more...
Thursday, September 17, 2009

I don't know what's worse: the fact that I actually know the majority of keyboard shortcuts in Aperture or the fact that I'm excited that somebody actually made a
keyboard shortcut cheat sheet. The post is almost 2 years old -- that's how long it's been since Aperture 2's had a major update, I guess. But the content is still all correct from my cursory glance at the two sheets. Included in the ZIP is a printable version and a pretty version.
Read more...
Wednesday, August 5, 2009

This particular effect is sometimes over done, but I'll still pull it out at least once per event. It's a good way to bring your viewers attention to some particular color or object. In my example, I took a picture of a bride and groom kissing while holding out their bouquet. The scene is already not very rich in color beside the flowers so this was a good sample to demonstrate the Dodge & Burn tool in Aperture.
Dodge & Burn is a plug-in that shipped with Aperture 2.1. When Aperture 2.1 launched, the big new feature was support for plug-ins. It's an incredibly useful plug-in (especially for those without Photoshop) since it includes a whole collection of tools for editing your photos. The Dodge & Burn plug-in includes:
- Dodge (Lighten)
- Burn (Darken)
- Saturate
- Desaturate
- Sharpen
- Blur
- Contrast
- Fade
To begin, right click on the photo and select "Edit with" > "Dodge & Burn." Aperture will make a copy of the file (sorry, no more non-destructive changes!) and load that in the window. In the upper left drop down you'll see all the tools. There's only three settings with each tool.
- Size is the size of the brush. You can also change the size by using the scroll wheel or dragging two fingers on the track pad.
- Softness refers to the edge of the brush. The lower the number the harder the edge. I generally go for something pretty close to 1.00. If I want a harder edge, I just go back through the area with a smaller brush.
- Strength is how much of the effect you want. For my picture I knew I wanted a completely desaturated look, so I pushed strength all the way up.
For my picture, I chose to desaturate. Then I simply brush where I want my picture to be desaturated. It really helps to have a tablet when doing a complicated photo like this. The plug-in supports pressure sensitive controls which makes getting this done a lot faster. Once the painting of desaturation is done, simply hit Save in the lower right hand corner. DONE! (Ok, not really done. Once I finished painting, then I upped the contrast, saturation, vibrance, and sharpening; then I added a heavy dose of vignette.)
A big caveat about using plug-ins -- this one or any other one. Using plug-ins is DESTRUCTIVE! Aperture makes a copy of the image as a TIFF or PDF (check your settings) and that's what's used to edit. When you are in a plug-in or export, you're manipulating that file. Once you hit Save, that's it. There's no going back to some middle state like you can when you are just playing with your adjustments palette. Once you've got that TIFF/PDF duplicate, that's it. If you put that file into another plug-in, the "Master" or "Original" state of that image is whatever you last saved. So for my picture, it would be the post-processed version, not the true full color master image as you'd expect. One other thing. Once you have the TIFF/PDF duplicate, whenever you send that file to edit in an external editor or another plug-in, it no longer creates another duplicate. So if you want to create multiple states, then you have to manually duplicate the duplicate before you drop it into an external editor or plug-in.
Click through the thumbnail above to see a larger version of the
final image. Congrats M&R on your wedding!
Tuesday, July 21, 2009
One of my favorite features in Aperture is the ability to tether (via USB) a camera to the Mac and get instant results from my shots. Start by going to the menu (there's no default keyboard shortcut): File > Tether > Start Session. The dialog that shows up should be pretty familiar to you by this point. It looks pretty similar to the Import dialog. Click the Start Session button, and you're ready to roll.
Click the shutter or hit the Capture button in the tether HUD. Bam! It's in Aperture. Take another shot. Bam! It's in the project. The immediate feedback is extremely gratifying. Set Aperture to full screen mode (
F) and you'll see a full screen render of the image as it's shot. This can be useful and more accurate for dialing in settings on the camera (better than looking at the LCD screen on the back of the camera) or giving a model some immediate feedback. Just be sure to use a LONG (15' or more) USB cable or you might yank your Mac to the ground.
The biggest problem with tethered mode lies somewhere between Canon and Apple. Starting with the 30D and all their DSLRs since then, Canon changed how they support PTP. None of the new models can be tethered to Aperture. I'm currently shooting with a 40D -- I am a sad panda. (You Nikon people don't have anything to worry about for now.)
Monday, June 22, 2009
 Ok, I don't like to give recipes for photo editing, but there is one thing that I apply to most of my pictures. I like my photos with a little extra contrast, saturation, and vibrance. While I could use the Lift and Stamp tools to copy adjustments from one picture to another, I can save my adjustments as a preset.
Every controls group has a menu drop down where you can save the adjustments. Once you have the adjustments set, open the menu and select "Save as Preset." A dialog box opens for you to name this preset. Now you can reapply these adjustments to your hearts content by accessing the menu drop down on your other photos. The three control groups that I have presets for are: Enhance (I have a basic and a high contrast that I use for monochrome), Sharpening, and Edge Sharpening.
My big peeve with this drop down is how all the options are ordered. You'll notice that the first item in the menu drop down is to add/remove the controls group to the default set. This option shows/hides this control group by default on the Adjustments Inspector. This option is the one I use the least and it's at the very top. There's been a bunch of times when I've clicked it by accident. The name of this menu item is also rather confusing. The other thing I would like to see Aperture add is a preset for adjustments that span across multiple control groups. I want to add vignette, sharpening, and enhancements from one command -- one that I would like to tie to a keyboard shortcut.
Read more...
Wednesday, June 17, 2009
 Stacks is an important tool in organizing your files in Aperture. It allows you to group your photos together. When you burst a series of shots or bracket a series of shots, you may not want to see each individual image. To clean up the browser, select all the images and ⌘K. This puts the selected images into a single stack of photos. Initially it doesn't appear any different except now there's a border around all those images. ⇧K will open/close the stack. Stacks eliminates the clutter in the browser.
When the stack is closed, the first picture is all that's visible. That picture is called the pick. If the desired picture is not the pick, select the one that is desired and hit ⌘\. Within the stack, there's additional sorting that can be applied. Promote/Demote (⌘[ or ⌘]) a picture moves it further up/down the stack. The sort within the stack is independent of the sort in the browser. The stack is sorted only against how the pictures are promoted/demoted.
When the stack has been added to an album, a further option is available for picks. The "album pick" allows the album to have a pick that is different from the project. This is useful for when a particular stack may have multiples of the same image but each is processed differently. Unfortunately there's an inherent limitation in that you can't promote multiple pictures within the stack to be album picks. For that, you will have to break that picture out of stack.
I use stacks quite a bit. I tend to shoot on burst mode. Keeping photos in stacks helps me keep the pictures in my browser clear of clutter. It also lets me hide my uglier shots behind a nicer one.
Read more...
Sunday, June 7, 2009
I have a very popular name for my email address. So much so that in any given week, I see around 5-8 password reset requests. I also get lots of other people's emails. Today was one of those days. Today somebody used my email address to sign up for an Aperture 2 trial. While I've already got a copy of Aperture, I was reminded that Apple provides a pretty good collection of video tutorials on their website:
http://www.apple.com/aperture/tutorials/
Read more...